How to Draw a Cat on a Tree
This post shares my DIY cat tree using a real tree! Learn how to make a cat tree from a natural branch…yes, that I drug out from the woods.
How to Make a Cat Tree From a Real Tree and My Stunning DIY Cat Tree!
I have wanted to make a cat tree with real branches for a long time. It's one of those projects that's been bubbling up on my dream project wish list for a while. I am ecstatic with the finished tree!
One day while we were at my parents' house, my dad and I went out into the woods behind their house and emerged with two branches. This is the cat tree before photo:

I had a bigvision for these branches! But first I had to let them dry out indoors, so while I was doing that, I started browsing some inspiration for realistic-looking cat trees.
Some of my favorites are at Pet Tree Houses. They do some really stunning work. Here are some of my favorites. Definitely check them out if you're in the market for a cat tree but don't have the time to put in to doing one from scratch! (Image removed)
Since I'm not a professional woodworker and many of these trees were made by professionals, I tempered my expectations and decided to take bits and pieces from each design to incorporate in to something that I could realistically make.
I sketched out a super advanced design with a pencil and paper. Sit back and enjoy my skills:

So I actually didn't end up being too far off from what I wanted. So with these fool-proof plans ready to go, I started gathering supplies.
SUPPLY LIST:
(This post contains affiliate links. You can read more about that here. Thank you!)
Branches & support pieces:
- A big branch and a small branch. My small one is about 3′ tall, and my big one is about 5.5′ tall
- A paint scraper—like this onehere
- Minwax Stain in Natural and Rust-Oleum Ultimate Polyurethane in Satin
- Small hand-held saw
- Sisal for scratching post portions
- Faux vines—mine are old from Jo-Ann (Note: don't use faux plants if your cats like to eat them. My cats don't touch them, but would eat and throw up real plants.)
- 2″ x 48″ dowel, cut in two pieces for the scratchers (here)
- 2.5″ wood screws
Base & platforms:
- One piece of 3/4″ plywood cut to 2′ wide by 3′ long
- 2 pieces of 1″ x 3″ x 8′ pine for the base's ledge
- Rust-Oleum Wood Stain inKona and Minwax Polyurethane in Semi-Gloss
- Decorative rocks—browse them on Amazon here
- Stepping stones from Lowe's—here
- Pine scrap pieces in various sizes for the platforms
- Brown faux fur fabric—reused
Miscellaneous tools & supplies:
- Miter saw
- Drill—I have this one
- Assorted sandpaper—I used 100 and 150 grit
- Hand-held staple gun
- Liquid Nails Heavy Duty Construction Adhesive—it's cheap and wonderful
- Various sized nails and screws

And here are the DIY cat tree plans!
(Remember to wear a mask and eye protection while sanding and working with wood, and wear an appropriate mask while working with paints, stains, and finishes. Follow the directions and warnings from your particular brand. Do not use any tools without proper training, precautions, and supervision from a professional. Read my full terms of use here.)

Step 1: Scrape, sand, and finish the branches.
The first step for my DIY cat tree using a real tree was…to find a real tree and prep the branches! Once our branches were sufficiently dry, we stripped the bark off and then finished and sealed them.
This is actually a lot of work, so I broke those steps out in to their own detailed post about how I stripped, stained, and sealed my branches! You can see my full post on how to finish branches for decor here.
But here's a glimpse at the very messy and very frustrating but very rewarding process:

After we stripped the bark off, we leveled the branches as best we could. Some people recommend a laser level, and while I'm sure that would have been 1000000% times easier, we leveled the tops and bottoms of the branches by eyeballing and then sawing off very small portions at a time.

Step 2: Attach the branches to the base and finish the base.
First, we pre-drilled holes in the branches. Our branches had a few cracks from drying, so we made sure to avoid those areas when drilling. We positioned and attached the branches to the main base piece, the plywood, by screwing 2.5″ screws up through the bottom of the plywood and into the branches. We also added Liquid Nails on the bottom of each branch before screwing them on.
Next, we built out and finished the base. We built a raised edge all the way around using 1″ x 3″ pine pieces cut to length. This serves two purposes: it covered the rough edge of the plywood while also creating a space for rocks to make the tree bottom heavy. I stained the entire base in Kona and finished it with two coats of semi-gloss polyurethane.

Step 3: Create and install the scratching posts.
Once the base was finished and the two branches were attached, we worked on the scratching posts. We made the posts using a 2″ x 48″ wooden dowel cut in to two pieces. I stained and finished these in Kona and semi-gloss poly to match the base and glued sisal rope around them.
To get the sisal rope to stay while the glue dries, we shot in a few staples with a hand-held staple gun. (We removed to protect our cats' claws when the glue dried.) Then we dabbed some Liquid Nails on the bottom of each post and screwed them in to the base just as we did the tree branches.

Step 4: Create the platforms.
I grabbed four scrap pieces of pine to use for the platforms. I loved being able to use these little pieces that had just been sitting around! The back scratching post platform is very small—more like a step stool for the little girl—while the front scratching post platform is a bit bigger.
The two higher platforms are about the same size—big enough for King Henry to max out. We also build out a tiny little ledge around the highest platform to coordinate with the base.
I decided to do a mix of stained (Kona) and finished (semi-gloss poly) platforms to match the base and platforms upholstered with faux-fur fabric. They had the same faux fur on their old cat condo, and they loved it, so I just reused that.

Step 5: Install the platforms.
We used a combination of Liquid Nails, screws, and a nail gun to secure each platform in place. Here's my dad looking adorable while we were attaching the platforms!

Step 6: Add finishing touches!
Yay, almost done! Time for the finishing touches. I put a few cheap stepping stones and big rocks in the base to keep the tree bottom heavy. The rocks are big enough so that neither cat will understandably mistake the base for a litter pan and Henry won't eat them (he is an asshole and eats lots of things he shouldn't).
The stepping stones allow them to walk around the base and helped me keep costs down since they were so much cheaper than the rocks. I also picked up some faux vines to wrap around the branches. I would not have used these if our cats were into eat fake plants, though. They ignore them.
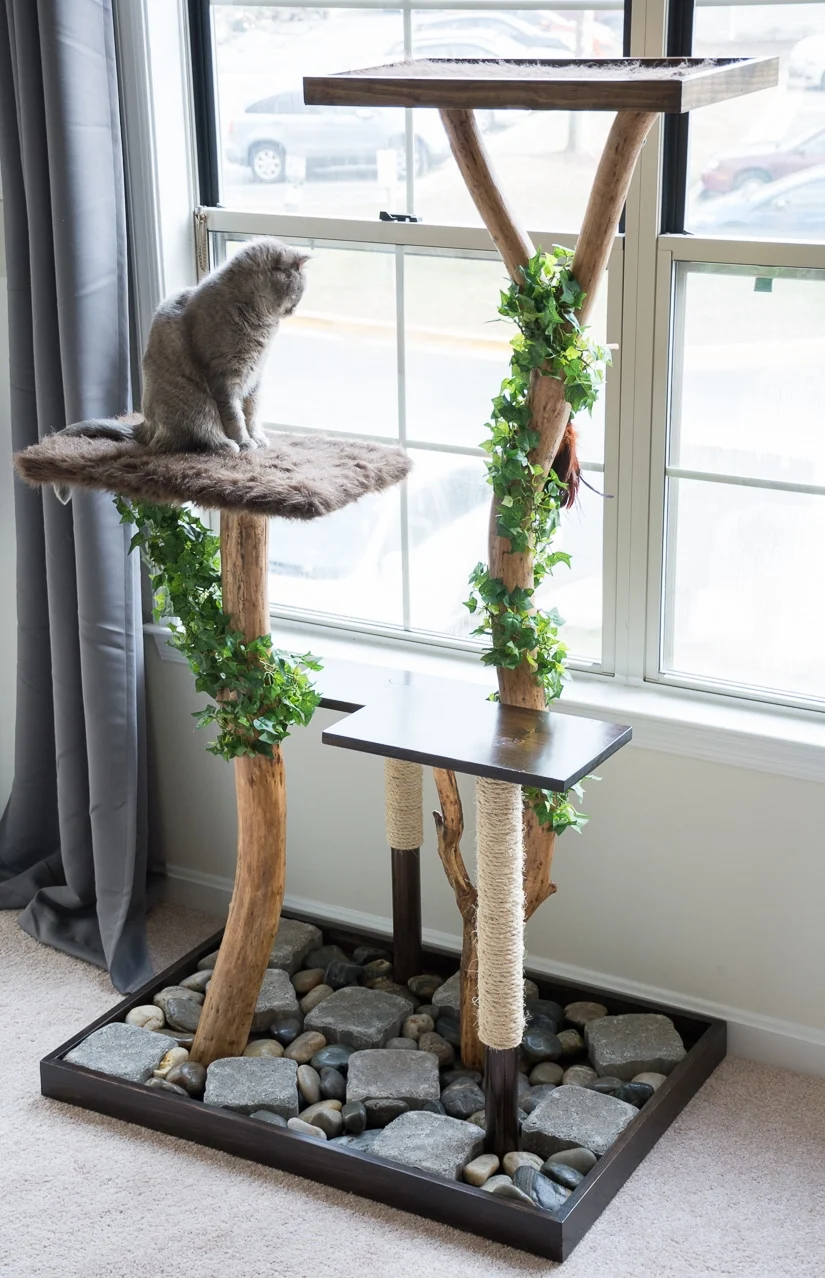
And here it is—Our DIY cat tree using a real tree in its home:


If you loved this, definitely check out my raised cat feeder DIY, my easy DIY catnip toys, my cat house side table build plans, and this roundup of DIYs your pets will love!
You're going to love my total cost for this project. The tree I really loved was $800 (and used fake branches!). For my tree, I spent…
$75.12!
Here's the breakdown of what I paid (I did use coupons for a lot of this):
- Satin finish for the branches ($6.00)
- Semi-gloss polyurethane ($6.47)
- Faux vines ($12.99)
- Decorative rocks and stepping stones ($25.07)
- Lumber for the base ($13.14)
- Wooden dowel ($7.98)
- Liquid Nails (3.47)
Everything else? It was found, foraged, already owned, or borrowed with the help of my sweet dad!
An update about our tree branch cat tree & more trees from readers!
I published an update post two years later to let you all know how the cat tree is holding up. Check out the updated cat tree post.
I have also had a few readers reach out to let me know they used this tutorial to make a tree for their kitties. They graciously allowed me to share them to help inspire you all to create your own!
Bryan's tree…
Bryan has some great tips, and I love how he added the L-brackets to secure the top platform to a wall to prevent swaying. Thanks for sharing, Bryan!
Hello, just wanted to pass on a short note of thanks for you wonderful cat tower project design! I recently became a Cat Daddy again, and my new baby (Wesa-Ki) is a very energetic Maine Coon kitten. He's been a climber from the word Go, so I started looking around for something not out-of-the-box for him to get his exercise and observations. When I found your blog post, I said "Oh YEAH!" 😉 It took me about 6 weeks of gradual work, and learning new tricks to do this solo, but I always love a good challenge.
A few tweaks from your design, I extended the base width to 4′, and since it wasn't going in front of a window, I extended the short side tray pieces of the top platform to extend to the wall. Added a couple of L-brackets to secure it to the wall, and gained some great stability to the tall branch, as it had a bit of potential sway at 5.5′ tall. Even using a 5″ lag bolt to secure it to the base, and using baseboard brads around it, there was just a bit too much play in it, but it's rock solid now! The kitty and I thank you again!
-Bryan


Alex and Julia's Tree…
My jaw dropped when I got this email from Alex and Julia. Their tree absolutely blew me away! I love how it goes from the floor to the ceiling. It truly looks like it is growing up through the house. I am now extremely jealous that my tree doesn't do this, lol.
Here are a few things they did that I also loved—
- After scraping all of the bark, they filled the cracks with resin: "The only real step we did that you didn't was to fill the cracks with epoxy resin stained with mica powder in a dark chocolate colour and sanded it back to a smooth finish afterwards. It took ages!" Genius.
- I love the "toadstools" as well. You can see how they made those by stacking batting in one of the pictures below with Julia.
- The branch that stretches out far to the side of the main tree—you can see that it is pretty thin and might be wondering how it is supported. If you look closely at the pictures below, you can see that they added two L brackets to the wall to help.
- On that same perch, they very smartly made the fur topper removable by using what looks like tied cord and hooks screwed onto the bottom of the perch. Excellent idea for washing, and I'll probably do that when I get around to replacing ours!
Thank you Alex and Julia for sharing!!


Pin This!

Instructions
- Scrape, sand, and finish the branches. For a detailed tutorial on how to do this read this post.
- Level the tops and bottoms of the branches by eyeballing and then sawing off very small portions at a time.
- Pre-drilled holes in the branches.
- Attach the branches to the main base piece, the plywood, by screwing 2.5" screws up through the bottom of the plywood and into the branches.
- Add Liquid Nails on the bottom of each branch before screwing them on.
- Build out and finish the base.
- Build a raised edge all the way around using 1" x 3" pine pieces cut to length.
- Stain the entire base in Kona and finished it with two coats of semi-gloss polyurethane.
- Make the scratching posts using a 2" x 48" wooden dowel cut in to two pieces.
- Stain and finished the scratching posts in Kona and semi-gloss poly to match the base, then glue sisal rope around them.
- Dab some Liquid Nails on the bottom of each post and screw them in to the base just like you did the tree branches.
- Create the platforms and cover with faux fur.
- Use a combination of Liquid Nails, screws, and a nail gun to secure each platform in place.
- Put a few cheap stepping stones and big rocks in the base to keep the tree bottom heavy.
- And you're done!
Notes
Note: don't use faux plants if your cats like to eat them.
Source: https://www.bybrittanygoldwyn.com/make-a-real-diy-cat-tree/
0 Response to "How to Draw a Cat on a Tree"
Post a Comment